Till few years back building a website was a difficult and a challenging task as you have to be proficient in the areas of web designing, coding and programming. However with the right tools and resources website building has become just a piece of cake now days. This step by step tutorial will guide and help you to create website from the very base foundational level without burning a hole in your pocket.
And you absolutely do not have to depend on agencies, freelancers or website builders to get your website up and running. Spend about 1-2 hours of your free time to go through the tutorial and build your website from scratch.
So what are the things needed to build a website?
The three important things that are primarily needed to build a stunning website is
- Domain Name for your website (example www.yourwebsitename.com)
- Website Hosting Accounts
- WordPress
You will need to acquire a domain name and set up a web hosting account to build a complete and a fully functional website. The domain name and the web hosting account have to complement each other really well in order to have your website up and running. Once you have the domain name and the web hosting account in place, you can create a WordPress website with a simple 1-click process. As per statistics more than 35% of the internet websites are built on WordPress website building platform.
Below mentioned are the steps you can follow to launch a full-fledged website in its complete form.
Step #1- Select a Domain Name
The domain name is basically your website identity and the name or address by which your user identifies your website. You can set up anything as your domain name that suits your website content or showcases the identity of your business or brand.
The usual price of a domain name is $15 and can range from anywhere from $10 to $50 a year. The domain names can vary according to your preference or requirement.
- If you are creating a domain name for a company or an organization,it should be in congruence with your company name. For eg: if your company name is abc corporation, your domain name can be abccorporation.com or abccorp.com etc. You can choose any available combination as a domain name for your organization respectively.
- If you are creating a domain name for your personal website you can choose names like yourwebsitename.com or yourwebsitename.org etc.
- If you are planning to attract more of international customers to your website, its better to go with domain names such as .org, .net, .com etc or if you are planning to capture country bound customers or visitors you can choose domains names like .de, .fr, .in, .cu etc.
In case you are feeling stuck and not able to find the right domain name for your website, you do not have to feel demotivated as there are more than 300 million domain names registered and more than billion possibilities available for you to build your perfect website.
Step #2- Acquire the Web Hosting Account and Register the Domain Name
The Web Hosting service is one of the most integral parts of website building process. You need web hosting to store your website’s files and contents. Hosting a website ideally refers to allocating space on a web server for a website to store its information and data. Without a web host, your website will not be accessible for your visitors to read and browse. A good website hosting service is like a two-sided coin where both the sides prove to be highly advantageous for the website owners. While one side gives you an affordable rate (between $3 to $10 per month) for your web hosting service, the other side gives you a promising investment for your whole life.
You have to look out for the following features before deciding to choose the web hosting service to set up your website.
Free domain name with SSL (Secure Sockets Layer)-If your domain name misses the SSL certificate, it becomes more vulnerable to hackers and online threats and eventually Google will warn visitors that your website is not secure. SSL certificates are small data files that digitally bind a cryptographic key to an organization’s details. Once the SSL certificate is installed into your web server, it activates the padlock and the https protocol and finally allows secure connection from a web server to the browser.
One-Click –install for WordPress- the One-Click-Install application for WordPress enables instant installation of WordPress and other applications and initiates effortless management of the same. Most of the web hosting companies provides One-Click-Install system for WordPress absolutely free of cost.
Custom Email Accounts- the Custom Email Accounts helps you maintain a professional appearance and consistent branding across all channels. With the custom email accounts you can use your own name or the name of your business instead of a generic Gmail, Outlook or Yahoo email address.
Unlimited or Uninterrupted bandwidth- you have to opt for the web hosting service that gives unmetered bandwidth. With unmetered and unlimited bandwidth you do not face any limit in data transfer however there will be a set limit to the maximum server speed.
24/7 Customer Support- the Web hosting service that you choose should have an in-house support team available round the clock to attend to your queries and issues respectively. They should be available at your beck and call and should not keep you waiting when any issue arises with the service rendered.
Ensure that your web hosting company offers the above and that means you have found a good and a suitable provider.
In case you are looking for a good provider, you can go ahead with Bluehost.com for website hosting and domains. You can avail free domain registration for the first year and its all the more easier to avail both the domain name and hosting from the same company. This will in turn save lot of time and money.
The Bluehost web hosting pricing plan starts at $2.75 per month and the domain prices start at $11.99/year.
Let’s walk you through the steps on how to create a web hosting account with Bluehost.
1. First visit Bluehost website and click on “Get Started ”
2.Choose your preferred web hosting plan from Bluehost. You have the option of the Basic Plan, Plus Plan and the Choice Plus Plan. The below image gives you all the pricing plan details of Bluehost. The Choice Plus plan is fully unlimited while the basic plan is best for new websites.
3.The next step is to choose and register a domain name which is free for the first year of use
4.Once the registration process is completed it will take a few minutes to get instant access so that you can start building your website right away.
Please keep in mind that Bluehost does not offer any country specific domain name endings such as .de, .fr, .in or .ru. If you need country specific domain name endings you can buy the same from Dynadot.com or NameCheap.com separately.
You just have to follow a certain process to update your name servers. Please change your name servers to the correct Bluehost name servers.
Ns1.bluehost.com
162.88.60.37
Ns2.bluehost.com
162.88.61.37
Following are the links to the specific registrars on how to update name servers on their systems. These are links to their sites to insure the most accurate information on their process.
Step #3- Set Up WordPress Website (Through Web Host)
Now you are all set with your domain name and web hosting and the next thing you will need is a suitable platform or a CMS for your website.
A CMS (Content Management System) allows you to create, handle and change the contents of your website without the need of any HTML or CSS coding skills.
The three best CMS currently are
- WordPress
- Joomla
- Drupal
One of the most used and highly efficient CMS is the WordPress since it’s easy to use and showcases thousands of free designs and add-ons that ensures to give your website a professional and a unique look. With the One-Click-Install technique setting up your WordPress website is easy. In case your web host provider does not give you the option of One-Click-Install technique for WordPress you can set up the same through a manual process. You also can install WordPress manually through Bluehost
1) WordPress Installation Process
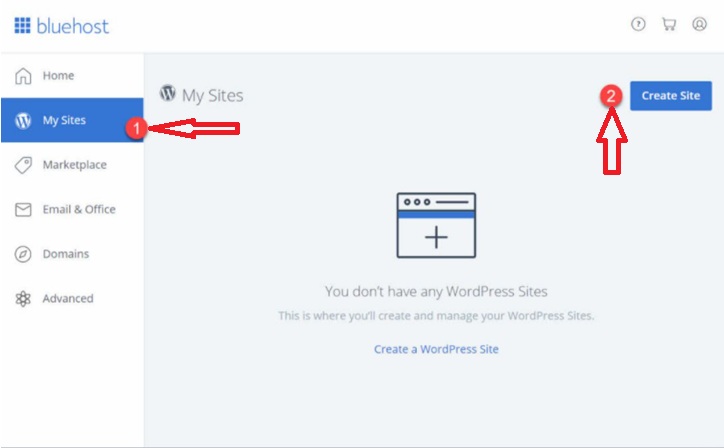
1. Log into your Bluehost account
2. Click on ‘My Sites’ and then on ‘Create Site’.
2) Website Test with your Domain Address
Get a test run done by typing in your domain name into the web browser. If the WordPress is correctly installed, you will get to see a basic form of your website like the below one
Do not worry about your website look as the following process will educate you on how to change your website design to make it look more appealing and enticing.
3) SSL and HTTPS Setting Verification
An SSL (Secure Socket Layer) certificate is a security element that ensures safe delivery of the website to your visitors. An SSL certificate is automatically added when you build a website using Bluehost or when you install WordPress through Bluehost.
You can verify the SSL status of your website with these steps:
- Log into your Bluehost Portal
- Click on “My Sites”
- Locate your website and click on “Manage Site”
- Go to the “Security tab”
- Under the “Security Certificate” you will be able to locate your “Free SSL Certificate” status.
If everything turns up good you will be able to find a lock icon next to your domain name in the web browser. Do not worry if your SSL certificate is taking time to get activated as this won’t stop you from building your website.
Step #4- Customize and Transform your Website Design and Structure
Now your website is ready in its most basic form. However add the right flavor by customizing the website design and adding in the brand elements to give your website that cutting edge. To customize your website you will have to:
1) Select a theme for your website
WordPress gives you real unique and exclusive theme designs to make your website matchless and distinct. You have the liberty to choose from thousands of free and paid WordPress themes from the internet to enhance the very look of your website. Usually people like to start with the free themes which is available at the official theme directory at WordPress.org. The Neve theme of WordPress exhibits lots of versatility and flexibility and comes with a handful of designs for starter sites catering to different niches.
We are going to use the Neve theme in this guide going forward.
2) Install your preferred theme
Open your WordPress admin interface at YOURWEBSITE.com/wp-admin. Input the username and the password details you got during the WordPress installation. Proceed further with the following steps:
1. Go to “Themes-Add New” from the sidebar
3. After the installation process is complete,click on the “Activate” button that will appear in place of the “install”button
4. You will get a confirmation message indicating that the installation was successful.
3) Import a Theme Design (Only for Neve Theme Users)
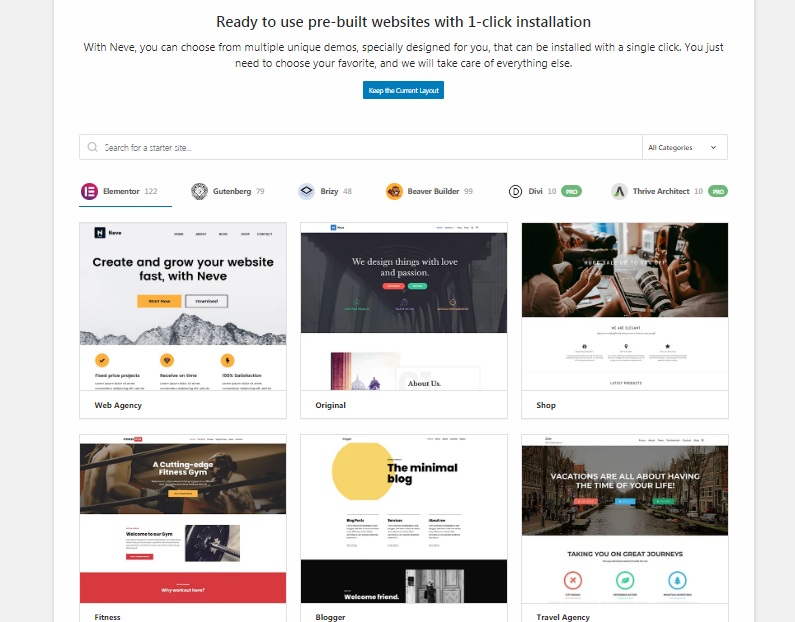
The Neve theme of WordPress exhibits a wide collection of designs that you can select from for your website. Click on the blue button to access the different designs from the Neve theme.
The Neve theme takes care of website designs suitable for almost all the market niches like Restaurant, business, fitness, music, food, wedding and much more. Lets name the first design on the list as “Original”
One of the prime aspects of WordPress theme installation is that the installation process takes care of all the elements in one go and you do not have to install them one by one to complete your website design. This ideally means that along with the website design you get the required plugins and the demo content that you can alter as you move forward.
Click on the “import” button to activate all the elements along with the design. You will receive the confirmation message in just a minute.
After all the elements are installed appropriately go to “Appearance”- Neve options to find out what else you can do with the theme.
4) Logo Addition
Once the desired design and theme is selected, you can go to the next step that enables you to upload your company logo which is an integral part of your online identity for your business. You can create your own logo with several DIY tools such as Wix Logo Maker, Tailor Brands, Canva, Free Logo Design etc.
After you have designed your logo you can add it to your website by following the below steps:
Go to “Appearance”- Neve Options
Click on the link labeled “Upload Logo”
After the logo is uploaded your webpage will look like this
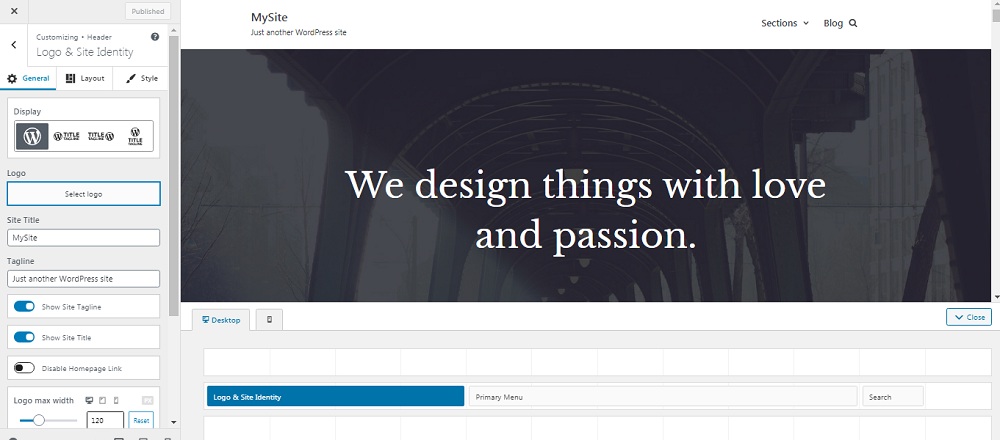
In the next step you are introduced to the WordPress Customizer that allows you to edit different portions of your websites look. To upload your logo click on the “Select Logo” button that is near the top left corner. Additionally, WordPress also gives you the option to crop the logo.
The rest of the changes that you want completely depends on your preference and liking. You have an option to display your website name and tagline alongside the logo and adjust the maximum width of the logo. Moreover you are given additional options that you can play with to give your website the desired look and appearance.
In the final step click on the “Publish” button when done (top left corner) and then click on the “X” button to exit the customizer.
5) Website Color Scheme and Fonts
One of the aspects that you can play with and experiment around is the Color Schemes and Fonts for your website. You can fine tune the color schemes to match your brand image and create that special identity for your website as well as for your brand. You can go through the following steps to adjust and manage the color schemes for your websites through Bluehost.
1. Go to “Appearance”- Neve Options. Under this option we are going to work with the Fonts and the Colors section of Bluehost
2. Let’s click on ‘Set Colors’ first
3. The various elements of the WordPress theme designs are primarily characterized by different color schemes.
4. The link colors, text colors and the background colors are the ones that take care of the different components of the WordPress themes.
5. You can use the Customizer tool to change the color assignment for the Neve theme.
6. Just click on the color you need and pick the same to switch between colors.
7. Click on “Publish” and “X” once you complete the process.
You can also choose and change the fonts on your website in a similar fashion.
1. Go to the “Appearance”-Neve options and click on the “Customize Fonts” link.
2. Pick up the suitable font from the extensive catalog of system fonts and Google Fonts.
3. Click on the “Font Family” box and select your preferred font.
4. Further you can modify the individual fonts used for your headings
Play with the font settings to view the effect they have on your website.
1. Click on the arrow button near the top left to modify the font for the body section of your website.
2. Click on “General” and you will be redirected to similar options panel.
3.Complete the process by clicking on the “Publish” button and “X” when done.
6) Sidebar for your website
The “Appearance”-Neve options panel gives you clear directions on how to set the sidebar for your website.
To begin with Click on the “Content/Sidebar.” This leads you to three main options in the Sidebar section
- No Sidebar
- Sidebar to the left
- Sidebar to the right.
The sidebar section also lets you adjust the content width for your website. Click on the “Publish” button and “X” icon to complete the steps.
7) Widgets for your Website
Widgets are simple elements that you can use to build to your website’s sidebars. They enable you to easily add text, links and various types of information to designated areas. Once the sidebars are positioned rightly in your website you can go ahead and customize the widgets.
To configure the widgets go to “Appearance-Widgets” and you will be redirected to the below screen
The widgets appear on the left side of the screen and on the right you can see all the widget areas supported by the current theme. Just grab the widget from the left and drag and drop it onto the sidebar area and your widget is successfully added to the sidebar.
8) Do more with your website theme
WordPress gives you the liberty to play around with your website theme so that you can customize and personalize your website to give it the ultimate professional and unique look. Browse at your convenience to find out the customization options for your website theme. To view the customization options go to “Appearance-Customize”. This will throw up the main interface of the customizer tool with all its setting features and presets.
Step #5- Add Content/Pages to your website
A web page is a simple element of your website that speaks volumes about your business, brand and last but not the least the website itself. WordPress gives you an easy tactic to build webpages for your website and before you know it your website is filled with the right content and the web page that gives the exact information about your brand. Let’s find out about each webpage and how they can be created for your website.
Homepage- the introductory page of your website that your visitors see once they enter your website.
About Page- This part of the webpage talks about your brand, business or your website.
Contact page- You go to the contact page to get in touch with the business owners, customer support etc.
Blog page- Blog page is something that holds all the blog posts, news, announcements and articles on different aspects and areas of your business or website.
Services page- the services page is used to showcase different products and services offered by your business or company.
Shop page- the shop page is for companies who are into the eCommerce business.
As far as webpages are concerned it is the content in it that makes the difference. So once you learn to create one webpage, you are good enough to create the rest of them for your website.
Homepage for your Website
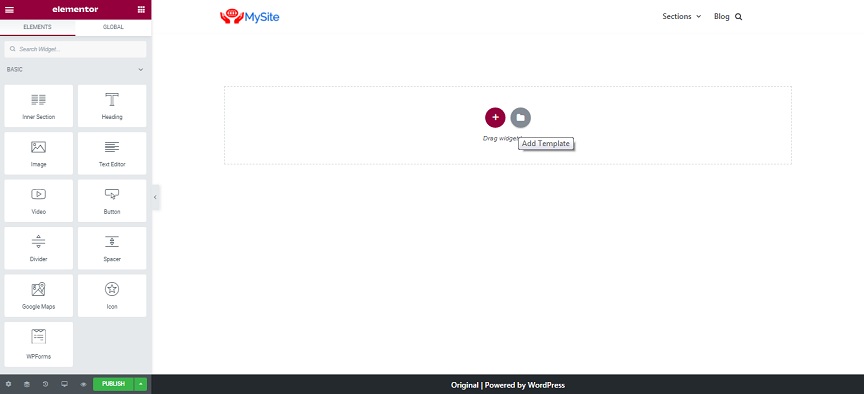
WordPress enables you to edit the very structure of your homepage and all the elements within. And for that you just have to click on the “Edit with Elementor” button on the top bar.
Once that is done your page will look some thing like the below screen
The Elementor component of the webpage creates an environment for you to edit and restructure your webpage from the way you see it. This ideally means there is no any test area for your webpage and as you can bring about any changes on the main page itself. This is why the Elementor tool is referred to as a Visual page builder.
The left sidebar gives you a full on customization panel that aids and assist you in adjusting the structure and the styling of any content block.
Also the drag and drop feature of the Elementor allows you to grab any element and rightly position as per your need or requirement.
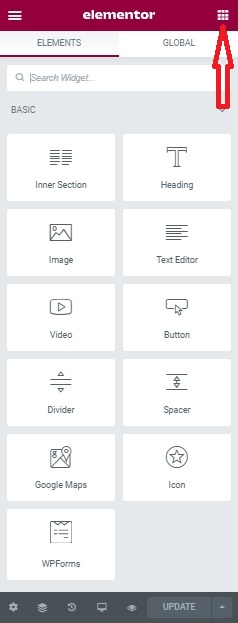
The square icon on the top left corner will let you add new elements.
Once the square icon is activated it will throw up a list of all the content blocks. You can grab any block and drag it to the canvas of the page.
Take a systematic route and go block by block for a disciplined work on your homepage. Edit your homepage structure step by step so that the webpage appears concise and clear in the end. There are lots of other actions that you can perform to give that finishing touch to your homepage. You can type in the text content, reorganize the blocks, add/delete the ones according to your preference or need.
This whole interface of WordPress is designed to match your intuition and engineered to give you a user friendly experience.
About page and Contact page for your Website
Once you are proficient in creating the homepage for your website, you can easily go about creating the classic pages for your website. Simply go to “Pages-Add New” and you will get the below interface
The Template Library will give you lot of options that you can quickly find and use blocks like in the below screen
Simply click on the “Insert” button next to your preferred block and it will be automatically added to the page. Thereafter you can further customize it, change the texts or replace the images.
Click on the “Publish” button in the top right corner of the
screen.
The Contact page or services page can be added by following
the same process. You just have to pick different page blocks from the template
library.
If you prefer to add new page elements manually simply click on the “+” icon that’s in the top left corner of the editor interface.
Similarly you can add the new paragraph block to your page and it looks like in the below screen
The paragraph block allows you to edit the contents easily, change the properties of the text and also the color settings in the sidebar. Just ensure to click on the “Publish” button when done.
Blog Page for your Website
You can post all the recent blogs in the Blog Page of your website. The plus point is that you do not have to follow any extra step to install the Blog Page as WordPress already gives you a pre-installed Blog page for your website. The Blog Page can be found once you click the Pages button on the interface.
Click on the “View” link to activate your blog page.
Add new blog posts
Go to the “Posts” button the left hand sidebar and click on “Add New”. Simply follow the further instructions and your blog posts are added effortlessly.
Step #6- Set up a Navigation Menu
All the required pages are created for your website and now you have to figure out the way your customers can navigate between the webpages that you have created for your website. This is where the navigation menu comes into play. To create the navigation menu
Go to “Appearance”-“Menus” and further click on “create a new menu”
Please follow the below steps to create your first website menu.
At the end of the process you can view your menu on the homepage in its full-fledged form.
Step #7- Introduce an Online Store/eCommerce
The WordPress website platform exhibits versatility at every phase and this is one of the prime reasons why it lets you build a fully functional eCommerce online store. The WordPress eCommerce sets a strong base so that you can add any number of products and put them up for sale, collect orders from your customers and even handle all the tax and shipping related information of the whole process.
This entire structure is handled by a plugin called WooCommerce.
WooCommerce has proved to be one of the best eCommerce platforms for WordPress and has encouraged many entrepreneurs to fare well in their online eCommerce ventures. WooCommerce automatically creates new pages once it is installed in your website. The WooCommerce gives you the following pages:
Cart- Your online shopping bag
Checkout- Customers can complete their shopping process at the checkout page
My Account- this page gives you a snapshot of the customers details like their address, past orders, cancellation information etc. The customer can always edit their information on the “My Account” page.
Shop/Products- the main page of the online store where all the products are displayed with their related information.
With WordPress+WooCommerce you can sell a wide range of products like
- Digital Products (software, e-books etc)
- Physical Products
- Services
- Bookings
- Subscriptions
- Affiliate products
Here are the steps you can follow to build an online store with WordPress, in a nutshell.
Step 1- the first step is to acquire a domain name and a Web Hosting account. The domain name will be your stores unique address and the web hosting account will store your website and then serve it to whoever wants to visit your site.
Step 2- Install WordPress
Step 3- Install WooCommerce Plugin
Step 4- Add your Products and Services
Step 5- Choose an appropriate theme for your online store
Step 6- Convert your E-commerce store into a Designer User Friendly one.
Step 7- Extend WooCommerce
For a detailed elaboration on each step on how to build an online store with WordPress and WooCommerce, please follow the link https://www.softwaresforever.com/woocommerce-online-store-tutorial/
Having an online store with WordPress and WooCommerce is an easy task as you can edit the elements, add your own elements, perform any action like changing colors, layouts etc. You only have to be careful not erase the WooCommerce shortcodes while editing the details.
Follow the instructions carefully and your online shop will be up and running in a jiffy. Now you just have to wait for your customers to come in and do their shopping. The WordPress admin area under “WooCommerce-orders” will display the customer’s order details.
Your Website is successfully launched and all good to go. Now the only thing you have to take care is figure out how to attract good traffic to your site and eventually monetize your website.












![Namecheap Review [2021]- Shop for the Right Domain name and Hosting service from the Right Place](https://blogger.googleusercontent.com/img/b/R29vZ2xl/AVvXsEg0eszLml50n5I9DM69RrvluMz_QDZ9oFEuIN_LDYpyNbXBi66V66WRCFnz8EI8sFde6F7xBuM2DdJvIzH4pOvqQYxzW2e0oy_vA8CBJflRfbqCHNpp5D-lpGnSdDRG7YE_gXdtmADREj0/s72-c-d/namecheap-home.jpg)

![AWeber Review [2021]-The Best Email Marketing Tool you can rely on](https://blogger.googleusercontent.com/img/b/R29vZ2xl/AVvXsEiyD_okxi9vGZM5zOSMIErRwiXxkHIZKISWwb4izhM7u3YB_kx6zJHZPcv9Oc0apQA6QTwf75ITf5Q-D6T7XFokPGpX6djJ74gIpdAL-_VGq895ReLbmtuh5gh5Eg5UFka08HKl1XT3BBo/s72-w640-c-h306/aweber1.jpg)
![Upleap Review [2021]- Increase your followers and Be a Star on Instagram](https://blogger.googleusercontent.com/img/b/R29vZ2xl/AVvXsEjsX_Pypq9q06eDol5EAxxzMiNhUezPlQW0eSoAvFAahqk9ATuLFcvJPMslTX_krPvvDz3uT56gBgzc5drmwjUlmXYQ4m-Vu_S-9Q45x6j-437Z-MVfvIffZd8dRI2S31o0Ff6w5Tmrdqs/s72-c-d/upleap_review_home.jpg)

![Namecheap Review [2021]- Shop for the Right Domain name and Hosting service from the Right Place](https://blogger.googleusercontent.com/img/b/R29vZ2xl/AVvXsEg0eszLml50n5I9DM69RrvluMz_QDZ9oFEuIN_LDYpyNbXBi66V66WRCFnz8EI8sFde6F7xBuM2DdJvIzH4pOvqQYxzW2e0oy_vA8CBJflRfbqCHNpp5D-lpGnSdDRG7YE_gXdtmADREj0/w72-h72-p-k-no-nu/namecheap-home.jpg)

![AWeber Review [2021]-The Best Email Marketing Tool you can rely on](https://blogger.googleusercontent.com/img/b/R29vZ2xl/AVvXsEiyD_okxi9vGZM5zOSMIErRwiXxkHIZKISWwb4izhM7u3YB_kx6zJHZPcv9Oc0apQA6QTwf75ITf5Q-D6T7XFokPGpX6djJ74gIpdAL-_VGq895ReLbmtuh5gh5Eg5UFka08HKl1XT3BBo/w72-h72-p-k-no-nu/aweber1.jpg)
No comments:
Post a Comment